Friday, April 30, 2010

Macarons


Have you ever heard of Tartellete???? If you have, I am sure that you associate her with the Queen of Macarons. For those of you not familiar with Tartellete -Helen actually, she is an amazing food photographer and has a site where you can find many many not only delicious treats but beautiful pictures. The first time I ever tried any of her recipes were the Apricot Teacakes which many of you seemed to enjoy. Well, Helen also makes amazing macarons. I assume they are amazing b/c I made some last week and they were delicious. So elegant also. Helen has probably over 20 different recipes for macarons. Let me clarify, the recipe is the same, it is the filling and the flavoring of the actual macarons are different. Some have lavender, some raspberry with mascrapone cheese, oh.... I am drooling already. These little treats are savory... For those of you who have never heard of macarons until reading this, like I did when I stumbled upon Helen's website, they are little cookie shaped meringues that are made with ground almonds. Then some sort of yummy filling gets scooped on one of them and the other macaron goes top up. Like Oreos. Yum. YUm. YUM. Either way, any baker knows that when she makes macarons and they come out right, it is a feeling of accomplishment. Why? I don't know... not that they are hard to make, you just have to be very careful. Well.. lets just say the first time I made macarons I didn't take pictures of them to blog about. I also wasn't taking step-by-step pictures this time but they came out perfect and I HAD to blog about them. I know... humble, right? Well.... If you ever want to feel satisfaction, try making macarons (although if they don't turn out right, don't blame me). The macarons I made were plain with a Ganache Mousse filling which I used when I made these. It is funny that I chose to follow Helen's recipe for Macarons from Farida's AZ Cookbook site. I have following both, but because Farida's were simple and to my taste buds, I decided to use her adapted version. Also, in all of Helen's recipes she uses 90gr wgg whites (about 3) and we used about 200gr (5-6 egg whites) to double the amount. Thank you Farida for the wonderful adaptation (and for letting me use your pics until I make macarons again) and Helen for the recipe.

Macarons with Ganache Filling
Basic French Merengue Macaron recipe by Helene of Tartelette. Published in Desserts Magazine -
slightly adapted by AZ Cookbook
Ganache Mousse recipe adapted from Williams-Sonoma Baking

You will need (for the shells);
5 large or 6 small egg whites (or 200 g weighed), at room temperature
1/2 cup (100 g) granulated sugar
1 1/2 cup (220 g)
blanched skinned almonds, whole
4 cups (400 g) powdered sugar


1. In a bowl, whip the egg whites to a foam, gradually add the sugar and continue beating until you obtain a glossy meringue.

2. Finely grind the skinned almonds in a food processor. Transfer to a mixing bowl. Add the powdered sugar and stir to mix. Gently fold in the beaten egg whites.

3. Fill a pastry bag fitted with a plain tip with the batter and pipe small rounds (1.5 inches in diameter) onto parchment paper lined baking sheets. (You can also use a teaspoon)

4. Preheat the oven to 300F (150C). Let the macarons sit out for an hour to harden their shells a bit and bake for about 15 minutes, until they have changed their color slightly. Do not overbake. Let them cool completely before filling.


Assembling
Spread a thin layer of the ganache (about 1 rounded teaspoon) over the cookie bottoms. Press a plain cookie onto the ganache mousse. Store the cookies in an airtight container at room temperature for up to 3 days.


Monday, April 26, 2010

PW's Drip Beef Sandwich


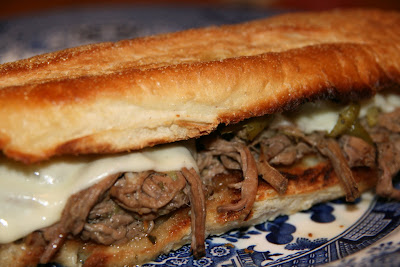
This sandwich changed my life. I am not kidding. (ok, just a little). But it almost changed my life. It is soooo good. The Pioneer Woman, my obsession, makes the meat for these in a Dutch oven. Since I do not own a Dutch oven and because I DO own a crockpot, I make these in the crock pot and it works wonders. It is so convenient to just stick the meat (+some ingredients) and leave for the day. (In my situation, this doesn't happen often, but when it does, oh boy, am I glad to come home to these babies.) This also doesn't require an expensive cut of meat, actually the cheaper the better. If you have a crock pot or a Dutch oven please make these. I am asking nicely, Please??? They might change your life, you never know.

Drip Beef Sandwiches
Adapted from P-Dub

Here is what you'll need:
  • 1 whole Beef Chuck Roast, 2.5 To 4 Pounds
  • 1 can Beef Broth
  • 3 Tablespoons (heaping) Italian Seasoning
  • 1 teaspoon Salt
  • ¼ cups Water (not pictured...)
  • ½ jars (16 Oz) Pepperoncini Peppers, With Juice
1. First, (I know, gross....) cut off the large chunk of fat (if your chuck has one) and toss it (or feed it to your dog if you have one....) lol
2. Add the beef broth and water to the crockpot (or Dutch oven).
3. Add in the 3 tablespoons of the Italian Seasoning.
4. ....and add in about 15 or so pepperoncinis, along with half the juice of a 16 ounce jar. Stir it around.
5. Now, throw in that large roast and then scoop out some broth mix on the bottom and pour it over the top.... just to coat it.
6. Close the lid (and please do not open during the entire roasting process).
7. Turn your old and passed down crockpot on low for 7-8 hours or high for 4-5 hours.
8. Leave it alone.... go to work or take a field trip with your kids.

9. Come back to some yummy meat which if done, should fall apart when picked with a fork. If your meat is not this tender it is not done. It need to go back in the crockpot and finish cooking for about an hour or so.
10. Now with two forks tear apart all the meat placing it back in the broth...
11. At this point you are ready to make sandwiches. You can also put this in the refrigerator and reheat it the next day and have Drip Beef Sandwiches for lunch. (The meat will stay good in the fridge for up to one week. Because it is in a vinegar broth... the acidity keeps it from going bad quickly, kind of as if it is pickled.)

12. Now when you are ready to assemble, you will need some deli rolls, Mozzarella (or really any kind) cheese slices, and butter.
Yum, bread, butter and cheese, I could eat that alone.....

13. Butter the deli rolls....14..... and toast them in the oven (I was making just one sandwich so I used my toaster oven.)
Once toasted instead of turning off the oven turn it on BROIL...
15... and burn them if you are me. But that is ok, I like them this way...
16. Now heap some meat right onto the toasted roll. Top with some of the peppers.
17. Add slices of cheese... and stick back in the oven under BROILER for a minute until the cheese melts.
(Do not step away as this happens quickly)
18. Now this... the juice from the pot... is what makes these sandwiches called "DRIP beef"..... scoop some out into a small dish or ramekin...
... and when the cheese has melted, top it with the upper half of the roll.... (obviously)
.... cut the sandwich into half.....
.... and use the drippings to dip your sandwich in them....
Yum.
YUm.
YUM.
Yummy.

You get the point, right????


Thursday, April 22, 2010

Graham Crackers... and more....


OK.... today I made something VERY simple and VERY Yummy. Since it was my first time making it, I did not take pictures nor was I planning on blogging about it.... but how could I keep this from you???? Last week I made a cheesecake and therefore I had some "leftover" graham crackers. These really were not "leftovers" as I make cheesecakes often and will probably need to buy another box in the near future. But, I looked at my "leftover" graham crackers and debated the things I could make with them. I wish I could tell you that I made this recipe up... but I would be lying. It is ok though... because I used the recipe and then for the topping I made a ganache mousse from Williams and Sonoma Baking Cookbook to spread over. And.... are you ready??? I topped the top with half of a sliced strawberry. It was much more presentable that way! The assembled and cut squares reminded me of tiramisu (the way it looked). The taste was... well yummy. Light and fluffy. The ganache mouse added that perfect chocolate hint....I know... you are thinking, "so... what was it that you made?"

This:


It is GRAHAM CRACKER CAKE SQUARES
From Kraft

You will need:
15 Graham Crackers, broken in half (30 squares), divided
1 pkg. (3.4 oz.) JELL-O Vanilla Flavor Instant Pudding
1-1/2 cups cold milk
1 tub (8 oz.) COOL WHIP Whipped Topping, thawed

1.Arrange 10 graham squares, slightly overlapping, on bottom of 8-inch square pan; set aside.
2. Beat pudding mix and milk in large bowl with whisk 2 min. Let stand 5 min.
3. Stir in COOL WHIP.
4. Spread half the pudding mixture over graham squares in pan; top with layers of 10 of the remaining graham squares, remaining pudding mixture and remaining graham squares.
5.Refrigerate 3 hours.
Spread with ganache, chocolate frosting or ganache mousse just before serving.


If you would like to make the:
Ganache Mousse:
From Williams and Sonoma as seen on AZ Cookbook
(Thank you Farida for the picture)

You will need:

15 g semi-sweet or bitter-sweet chocolate
1/4 cup (2 fl oz / 60 ml) milk
1/4 cup (4 fl oz / 125 ml) heavy cream


1. Put the chocolate in a heatproof bowl. In a small saucepan over medium-high heat, bring the milk just to a boil. Remove from the heat and immediately pour over the chocolate. Stir with a wire whisk until the chocolate melts and the mixture is smooth.

2. In a clean bowl, using a balloon whisk, whop the cream just until soft peaks form.

3. Gently fold the cream into the chocolate just until the two mixtures are incorporated. Do not overfold, or the filling will be gritty. Cover with plastic wrap and refrigerate until firm and spreadable, about 1 hour, or for up to 3 days.


Please keep in mind these need to be refrigerated, as the frosting is mousse and can melt!


Wednesday, April 21, 2010

The World Blogs

I am so excited. Excited because I see more people starting to blog. Why does this make me excited??? Oh, I don't know. It is not like I have too much time on my hands to sit here and read all these blogs besides that ones I already do read... no.... but I do. It is nice to read how people are living and what they are thinking. It is a bittersweet feeling. Pavel from our church just recently told me he started a blog and although he only has one post, not really even a post, I am still excited. Yesterday I was browsing on Facebook, more like "stalking" as someone described to realize that Tanya, a girl whom I know a little who lived in Italy for a little bit also blogs. Cool! Now today, another friend, Stephanie, a mom of 3 little ones, who recently created a blog called "Dead and Domestic" scary but funny blogged about food and my blog. I was thrilled. Not so much that she blogged about "me" or "my blog" but about food and how it brings people together. She also included this verse from the Bible which made me happy.


So, to all of those who read and blog....happy reading and happy blogging. Most of all HAPPY EATING and HAPPY FEEDING!!!

Monday, April 19, 2010

German Pancakes with Sauteed Apples


I like to think of myself as partially German... which I am (but only about 1/4). Does that count??? I like like to think I am Jewish (as does my husband and my parents) which I am NOT, as in at all... Oh well. :) Either way, when I saw a recipe for "German Pancakes" although some refer to them at "Dutch Babies" I felt like I was obligated to make them. I mean, I am German, right??? Partially??? German Pancakes are large pie crust almost pancakes (at least in this case) and can be topped with numerous different toppings. The original recipe suggested lemon slices and powdered sugar, Deb from Smitten Kitchen where I found the recipe suggested fresh berries and maple syrup. Since I did not have any berries or syrup on hand I raged my fridge and found a couple of apples. PERFECT, I thought.... what could be more German than something with apples in/on it??? So I sauteed them in some brown sugar and topped my pancakes with them. The combination was wonderful. The pancake itself was not your regular pancake. It was much more of an "omelette" than of a "batter" pancake.... I mean 4 eggs to 2/3 cup flour... Either way, I thought it tasted great. What I loved best about it was that it was something different. Not pancakes (although we love pancakes) nor an omelette (which we love too). Either way, try it. Let me know what you think.
German Pancakes
Adapted from Smitten Kitchen

This recipe makes two 9-inch pancakes.
You will need:
4 eggs
1 tablespoon sugar
1/2 teaspoon salt
2/3 cup flour, sifted
2/3 cup milk
2 tablespoons soft butter
1. Preheat the oven to 400F.
2.Dump the eggs into the bowl of an electric mixer. Mix until light yellow in color. (You can also use a blender for this batter)
3. In the meantime grease two 9inch cake pans. Grease well....
4. When the eggs are done beating, add in the remaining ingredients.
......... The recipe did not call for melted butter, just softened and I had clumps of butter in the batter (which weren't a big deal as they melted in the oven, but you could also melt the butter ahead of time and then add it to the batter or even better instead of "buttering" the cake pans pour a little melted butter in the pans and then pour the batter over the butter. Have I confused you enough???


5. Now, pour half the batter into one cake pan and half into the other. Because I have a little OCD (not really...) I poured the batter first into a measuring cup and then that way I made sure it was split evenly between the cake pans.
6. Bake in the preheated oven for 20 minutes at 400F, after 20 minutes turn the heat down to 350F and bake an additional 10 minutes.
7. In the meantime, I made sauteed apples to top the pancakes with. If topping with something else, ignore steps 7-12.

If using sauteed apples as a topping you will need:
2 Apples
1/4 cup brown sugar
1 tablespoon cornstarch
1/2 cup cold water
cinnamon (optional)

.... First, I took two Granny Smith apples, because it is what I had, and peeled and cored them. Then I sliced them into think wedges.
8. Melt about 3 tablespoons unsalted butter on medium heat in a 10 inch skillet....

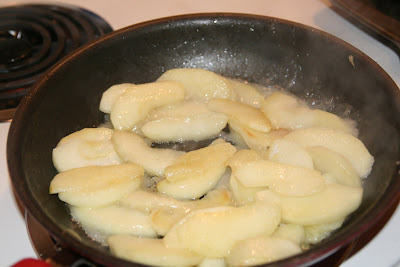
8. Add in the apple slices and saute over medium heat stirring constantly for about 10 minutes or until tender and beginning to change color.9. In the meantime, take 1 tablespoon cornstarch and dissolve it in 1/2 cup cold water. Set aside.
And.. in the meantime, without opening your oven show your toddler what kind of fun shaped pancake we will soon be eating. Ours was very amusing.

... Back to real world... and the apple slices.... They should be starting to smell yummy and get some golden flavor on them.
10. When the apples have started to change color, pour in the cornstarch/water mixture and stir into the apples.
11. Now, add about 1/4 cup brown sugar and a dash of cinnamon (if using). Let them get acquainted.
12. Then reduce the heat and simmer for 3-5 minutes. Turn off the heat and wait for the pancakes to be finished baking.
Mmmmm..... I could eat this right out of the skillet or with some ice cream.....


When your pancakes are done, slide them onto a dinner plate.....

..... and top with those yummy apple slices, or whatever else you chose. I also sprinkled with powdered sugar..... just to make it fancy.
Oh and, try to keep your husband from devouring them while you are still taking photos. :)