Thursday, February 25, 2010

Chianti Braised Shortribs


Since I have started blogging, I have shared many of my personal favorite recipes with you. This is one of them. My husband and I love Italian food and we like to go eat at the Olive Garden. A few years ago we went to the Olive Garden and Zhenya, my love, ordered Chianti Braised Shortribs. They were soooooooo good. I kept on wondering how they were made. Myself, not being a huge fan of red meats, I have to admit that this is my FAVORITE beef recipe. The cooking time is 3 hours, but if you are going to be home or have an errand to run just turn this on and let it cook on its own... the magic happens right in the pan...

Chianti Braised Short Ribs
Adapted from Olive Garden

Here is what you will need:
3 lbs boneless beef short ribs
Salt to taste
Pepper to taste
¼ cup extra virgin olive oil
1 medium yellow onions, chopped
4 large garlic cloves, minced
2 cups Chianti wine
1 32-oz can crushed tomatoes
3 cups beef broth
2 tsp fresh rosemary or cilantro, chopped

1. Rinse the meat and pat dry with a paper towel. Rub with salt and pepper on one side......
...... and then on the other...
2.Coat a large, nonstick pan with olive oil. Sear the short rib pieces over medium-high heat for about 2-3 minutes on each side or until brown.

4. Transfer short ribs to a plate and let sit while you prepare the sauce.

5. Chop your onion....

... and add the onions to pan and cook over medium heat for approximately 3 minutes. Once onions are translucent, add garlic and cook for 1 minute; do not brown.

6. Add Chianti,and allow the liquid to partially evaporate before each addition (about 2 minutes).
7. Add the beef broth and let simmer for another 2 minutes....
8.Now add the tomatoes to the pan and let simmer 2 more minutes.9. Add your rosemary (I used cilantro because I didn't have any rosemary).
10. Remember these babies??? Now transfer them AND the juices that have accumulated back into the pan. The juice is like gold... DO NOT throw it out.


11.Lastly, cover and let simmer for 3 hours on low heat to complete the braising process.
.... almost 3 hours later.... mhmmmm......
... and I wish I had a photo with these next to some mashed potatoes or rice... or pasta... but they were soo yummy, we couldn't spend any more time on the photoshoot....

Peach Crunch Cake

If you want to make dessert super quick (not counting baking time) and have almost no dishes to wash and NOTHING to mix, this is it!!!! I know you don't believe me, but that ok you just gotta trust me on this one. This is SUPER yummy when warm and still good when at room temp. Serve it with ice cream (or without).... Mmmm so good on these cold and rainy days.


PEACH CRUNCH CAKE
Adapted from: Bakerella

Here is what you need:
24.5 oz jar of sliced peaches in light syrup
1 package yellow cake mix
1 stick butter (1/2 cup), cut into 16 pieces
1 cup brown sugar
1/2 cup chopped walnuts
1. Preheat oven to 350F.
2. Pour out your canned peaches into a baking dish (PREFERABLY 13X9 PAN)
3. Now take a knife and slice each piece in 2-3. And evenly spread around.
4. Take your layered cake mix (the entire box) and evenly sprinkle it on top of the peaches until all the peaches are covered.
5. Now, slice your cold butter into about 16 pieces and evenly layer on top of the cake mix.
Mhmmm... Butter :) You do know that butter make everything taste like 10X better, right?
6. Now evenly sprinkle your brown sugar on top of butter and across pan.
7. Now also evenly sprinkle the chopped walnuts. These give the cake that yummy crunch.
8. Put your "layered" cake into the oven....
..... and bake at 350F for 40 minutes.
ENJOY!

Wednesday, February 24, 2010

Lemon Upside Down Cake


I have always seen recipes for these and always wanted to try them. They are so beautifully presented. This time I found this recipe for a Lemon Upside Down Cake on the AZ Cookbook site. I immediatly bought some lemons and made this cake. It was soo delicious. Not too sweet, a little tart, and so fluffy. Perfect if you like lemons or with a cup of lemon tea. Yum... Now, go buy some lemons and make this now!!! :)

Lemon Upside-Down Cake
Adapted, barely, from Luscious Lemon D
esserts, by Lori Longbotham

From: AZ Cookbook


Here is what you will need:

3 medium lemons
3/4 cup (1 1/2 sticks) unsalted butter at room temperature
1/4 cup packed light brown sugar
1 1/2 cups all-purpose flour
2 teaspoons baking powder
1/4 teaspoon salt
1 cup granulated sugar
3 tablespoons finely grated lemon zest
2 large eggs, separated
1/4 teaspoon pure vanilla extract
1/2 cup milk

1. Position a rack in the middle of the oven and preheat the oven to 350F.

2.Trim the ends from the lemons and cut the fruit into slices 1/8 inch thick with a very sharp knife or a mandolin. Discard any seeds.


3. Melt 1/4 cup of the butter with the brown sugar in a, non-stick 10-inch skillet over medium heat.
4. Add the lemon slices, increase the heat to high, and boil, stirring, for 1 minute.

5. Remove the skillet from the heat and arrange the slices of lemon in an orderly pattern in the bottom of the skillet (if you are using an ovenproof skillet or into a springform pan)
6. Sift the flour, baking powder, and salt together into a medium bowl.

7. Beat the remaining 1/2 cup of butter with an electric mixer on medium speed in a large bowl until light and fluffy. Add the granulated sugar and zest and beat, scraping down the side of the bowl until light and fluffy. Add the egg yolks and vanilla and beat just until blended. Reduce the speed to low and add the flour mixture alternatively with the milk, scraping down the side of the bowl after each addition and beating just until blended.

8. Beat the egg whites with clean beaters on medium speed in a large bowl until stiff peaks form. Add one quarter of the whites to the batter and fold in using a whisk or a rubber spatula. Continue to gently fold in the whites, one quarter at a time, being careful no to overmix.

10. Pour the batter over the lemon slices and gently smooth the top with a rubber spatula. Bake for 45 to 50 minutes, until the top is golden brown and a wooden pick inserted in the center comes out clean. Let cool in the pan on a wire rack for 10 minutes.

Loosen the edges of the cake with a rubber spatula all around, invert it onto a heat-proof serving platter, and leave the pan over the cake for 5 minutes. If using a springform pan, remove the "sides" of the pan first then let cool for 5 minutes and remove the "bottom" of the pan gently while loosening the lemon slices from the pan with a spatula. Remove the pan and serve the cake warm, cut into wedges.


Parmesan Smashed Potatoes

Inna, a very good friend of mine, introduced me to Ina Garten and her Barefoot Contessa Recipe books. For that, I am thankful. :) Although someone (hmhm...) once claimed that I steal Inna's recipes, she herself said that they are really Ina Garten's and not her own. Therefore I am sharing with you a recipe of Ina's that I came across and loved. I know what you are thinking.... mashed potatoes??? But, no, these are not JUST mashed potatoes. These are mashed potatoes with the skins and which have cheese and half/half in them. Those two ingredients are what I believe make this dish so rich in flavor. When I make this for home I use 1/2 of each ingredient. If you are cooking for 4-6 you would probably want to double what I have posted or follow the original recipe. So here they are.... Parmesan Smashed Potatoes for you.

Parmesan Smashed Potatoes
Ina Garten, Barefoot Contessa


Here is what you will need:

1 1/2 lbs. new red potatoes (which isn't in the pic, my bad...)
  • 1 tablespoon kosher salt, plus 1 teaspoon
  • 1 cup half and half
  • 1/2 stick (4 tbsp.) unsalted butter
  • 1/4 cup sour cream
  • 1/4 cup freshly grated Parmesan
  • 1/4 teaspoon ground black pepper


1. Place the potatoes and 1 tablespoon of salt in a 4-quart saucepan and add cold water to cover. Bring to a boil, lower the heat and simmer covered for 25 to 35 minutes, until completely tender. Drain
2. In a small saucepan, heat the half-and-half and butter.
3. Put the potatoes into the bowl of an electric mixer fitted with a paddle attachment and mix the potatoes for a few seconds on low speed, to break them up.
4. Slowly add the hot cream and butter to the potatoes, mixing on the lowest speed (the last quarter of the cream should be folded in by hand).

5. Fold in the sour cream.6. Fold in the Parmesan cheese, the remaining salt, and pepper; taste for seasoning


7. If you feel as the potatoes are too thick, use more cream and melted butter. (Or you can just splash in some half and half or milk). Serve warm.*

***You can also reheat the potatoes by putting them in an oven safe dish and sprinkling some more grated Parmesan cheese on top. Then bake them at 350F for 20-25 minutes.

Monday, February 22, 2010

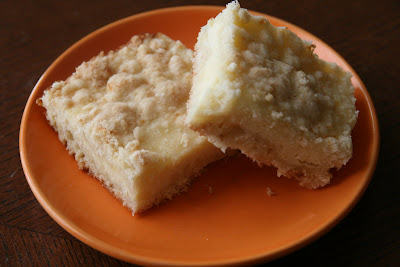
CRUMB CAKE


CRUMB CAKE
Recipe and picatures courtesy of Farida at AZ Cookbook
Here is what you will need:

Dough:
7 oz (200 g) unsalted butter, cold
1/2 teaspoon baking soda (bicarbonate of soda)
1/2 tablespoon plain yogurt or sour cream
2 cups all-purpose flour
1/2 cup granulated sugar

Filling:

14 oz (400 g) unsalted farmer cheese or ricotta cheese
1 cup granulated sugar
2 eggs
1/2 teaspoon vanilla extract


To prepare the crumbs:

1. Using the coarse side of a box grater, grate the cold butter into a mixing bowl.


2. Preheat the oven to 350F. In a small cup, dissolve baking soda in plain yogurt or sour cream and add to the mixing bowl with butter. Add the flour and sugar to the same bowl.

3 . Using a fork, gently cut into the mixture, until you obtain crumbs that are the size of chickpeas (do not use a mixer!). Set aside.


4.To make the filling; in a mixing bowl, combine all the ingredients for the filling together and stir until well blended.

5. Grease the bottom of a 9x11 baking pan or casserole dish.

6. Now, divide the crust crumbs in half and spread the first half of the dough into the greased baking pan. Do not press down.


7. Take the prepared filling and spread it above the crumbs in the pan.


8. Gently and evenly sprinkle the second half of the crumbs into the filling.


9. Bake at 350F for 30 minutes or until a toothpick is inserted and comes out clean.


10. Enjoy!